Matlab GUI -
Magic Trick!
|
We are going to develop a Matlab
GUI that performs a magic
trick!
We’re going to work on an interface to read your
mind! Don’t be
scared... it’s safe (as far as I know...). It’s an old trick that has
been
around for at least 40 years (maybe more), but this is my version with Matlab.
It’s the choose-a-card
type
trick...
|
Effect: the user
sees 21 shuffled cards
(absolutely random),
arranged along 3 columns. He/she chooses
a card but tells
nobody... the card is
only in his/her mind. The happy user indicates the column where the
chosen
card is,
and does this two more times. Every time the cards are randomly rearranged.
After a complicated artificially-inteligent algorithm, and using the
most
advanced artificial neural networks (??), our program guesses the
chosen card... Is
computerized
ESP possible? (Download
the code here!)
I strongly suggest you
read the first
and second
articles in
this series, where I explain in detail how to create a Matlab GUI, and
how to
use the
three most important instructions for GUIs (set, get and guidata). In this
article, I’m going to elaborate on how to use the ‘axes’ and ‘radio’ buttons,
as well as the associated callback-functions.
First, type ‘guide’ on your
command window. Select the
default option (blank gui).
You can see on the left several buttons that you can drag-and-drop
onto your gui ‘canvas’
or layout area.
Add an ‘axes’ button and
double-click on it to inspect and
modify its
properties. Set its position to [x y width heigth] = [10
22 8 2.5]. Try
to reproduce this figure:

Click once on ‘axes1’ and
copy-paste (Ctl-C, Ctl-V) this
element six more times (vertically). You can align the objects by
clicking on
the ‘Align Objects’
icon, on the top menu.

Select all of the 7 ‘axes’ and copy-paste
two more times
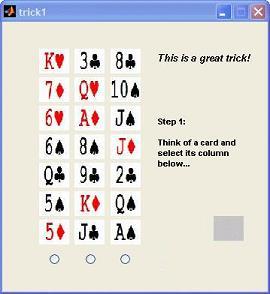
(horizontally). You have now 21 axes on a 7x3 matrix. Add then a ‘Static box’
to the right of your ‘canvas’, and you get something similar to this
figure:
Add
more elements (and modify their properties) until you
match the figure below:
You
have 22 ‘axes’,
3 ‘Static boxes’,
3 ‘Radio buttons’,
and
1 ‘Push button’,
right? You can modify their sizes by dragging the ‘anchors’ on
the corners.
For the 3 ‘Static boxes’,
update their properties like this:
| Property
|
Box 1 |
Box 2 |
Box 3 |
| Tag |
text1 |
text2 |
text3 |
| String |
This
is a great trick! |
(empty) |
(empty) |
| FontAngle |
italic |
normal |
normal |
| FontSize |
10 |
8 |
8 |
| FontWeight |
bold |
bold |
bold |
| HorizontalAlignment |
left |
left |
right |
For the 3 ‘Radio buttons’, just
erase their ‘String’
property and reduce their sizes to fit each column.
For the ‘Push button’, update
its properties like this:
| Property |
Button |
Tag
String
FontAngle
FontSize
FontWeight
ForegroundColor |
pushbutton1
Do it again,
please!
italic
8
bold
blue |
Save the Matlab GUI
(I
used the name ‘trick1.fig’), and Matlab
will produce a template for your figure (named
‘trick1.m’), with appropriate
names and comments or suggestions to get the values of the elements on
it.
For our trick, we’ll need
5 functions
that will be handled
from our main module
(‘trick1.m’). These functions will be:
- initialize_trick: to
shuffle the cards, show them for the first time and perform a reset
- showcards: to
display 21 out of 52 cards available
- display_instructions:
to display instructions on the ‘Static text’ boxes to let the user know
what’s going on and what’s next
- go_on: to keep the
trick going once the user selects the column of his/her card
- rearrange: to
pick-up the cards, rearrange and deal them again on the 7x3 matrix
This is the
implementation of the function named
‘initialize_trick.m’.
These names are going to be associated with a jpg file.
% Copyright 2009 by www.matrixlab-examples.com
function
initialize_trick()
global ha cards
% Define the 52 cards to be used
card_deck = {'ad' 'ah' 'as' 'ac' '2d' '2h' '2s' '2c' ...
'3d' '3h' '3s' '3c' '4d' '4h' '4s' '4c' ...
'5d' '5h' '5s' '5c' '6d' '6h' '6s' '6c' ...
'7d' '7h' '7s' '7c' '8d' '8h' '8s' '8c' ...
'9d' '9h' '9s' '9c' '10d' '10h' '10s' '10c' ...
'jd' 'jh' 'js' 'jc' 'qd' 'qh' 'qs' 'qc' ...
'kd'
'kh'
'ks'
'kc'};
card_nr = 52;
% Select 21 random cards from the deck (7 x 3
matrix)
for i = 1 : 7
for j = 1 : 3
% Select one random card from the remaining deck
r =
ceil(card_nr .* rand);
cards{i,j}
= card_deck{r};
% Delete that card from the deck
card_deck(r)
= [];
% Reduce the card account in the remaining deck
card_nr
= card_nr - 1;
end
end
% Display cards and first instructions
showcards;
display_instructions(1);
% Make sure to delete the last guess
str = '';
set(ha(24),'String',str);
% Hide button
set(ha(25),'Visible','off');
% Make the radio-buttons available
set(ha(26),'Visible','on')
set(ha(27),'Visible','on')
set(ha(28),'Visible','on')
This is
the implementation of the function named ‘showcards.m’. Here
we actually
associate a jpg
file (a card) with its corresponding place on the matrix. We
show a plain gray image
on the ‘axes22’
position.
%
Copyright 2009 by www.matrixlab-examples.com
function
showcards()
global ha
cards
%
Take one .jpg file for each 'axes' (21 cards to deal).
for i = 1 :
21
axes(ha(i));
[bg]
= imread(strcat(cards{i},'.jpg'));
image(bg);
axis
off;
end
%
Delete the guess
axes(ha(22));
[bg] =
imread('gray.jpg');
image(bg);
axis off;
This is
the implementation of the function named ‘display_instructions
.m’.
It
launches instructions on the ‘text2’
Static-box, according to the evolution of
the trick.
%
Copyright 2009 by www.matrixlab-examples.com
function
display_instructions(i)
global ha
%
Display instructions according to evolution of trick
switch i
case 1
str = {'Step 1: ';
'';
'Think of a card and
select its
column below...'};
set(ha(23),'String',str);
case 2
str = {'Step 2: ';
'';
'Hard to guess...';
'';
'Could you please select
its
column again?'};
set(ha(23),'String',str);
case 3
str = {'I cannot see it
clearly... ';
'';
'Please concentrate and
select its
column only once more...'};
set(ha(23),'String',str);
case 4
str = '';
set(ha(23),'String',str);
str = {'Ah! Got it! ';
'Your card is: '};
set(ha(24),'String',str);
end
This is
the implementation of the function named ‘go_on.m’. It’s
executed each time the
user clicks on a radio button to choose a column. After three clicks,
the
selection is revealed!
% Copyright 2009 by www.matrixlab-examples.com
function
go_on(hObject,handles,c)
global ha cards
% Take into account the number of choices by
the user
handles.t = handles.t + 1;
% Reset the current radio-button
set(hObject,'Value',0);
% Display the cards in a new order.
rearrange(c);
if handles.t <
4
showcards();
display_instructions(handles.t);
else
% Perform the trick!
display_instructions(4);
axes(ha(22));
[bg]
=
imread(strcat(cards{4,2},'.jpg'));
image(bg);
axis
off;
% Make the pushbutton appear
set(ha(25),'Visible','on')
% Make the radio-buttons disappear
set(ha(26),'Visible','off')
set(ha(27),'Visible','off')
set(ha(28),'Visible','off')
end
guidata(hObject,handles);
This is
the implementation of the function named ‘rearrange.m’. It
takes the three
columns of cards, each time the column with the selected card is put in
second
place. The other two columns are irrelevant for this trick.
%
Copyright 2009 by www.matrixlab-examples.com
function
rearrange(c)
global cards
%
Take the cards and the column of the selected card
%
is kept as second column
switch c
case 1
cards_aux = {cards{:,3} cards{:,1}
cards{:,2}};
case 2
cards_aux = {cards{:,3} cards{:,2}
cards{:,1}};
otherwise
cards_aux = {cards{:,2} cards{:,3}
cards{:,1}};
end
%
Deal the cards with the new order
k = 1;
for i = 1 :
7
for j = 1 : 3
cards{i,j} = cards_aux{k};
k = k + 1;
end
end
This is the main
wrapper (‘trick1.m’).
I deleted some
of the comments automatically written by
the Matlab GUI -DE (Development Environment), to simplify the
explanation.
% Copyright 2009 by www.matrixlab-examples.com
function varargout =
trick1(varargin)
% Begin initialization code - DO NOT EDIT
gui_Singleton = 1;
gui_State = struct('gui_Name',
mfilename, ...
'gui_Singleton', gui_Singleton,
...
'gui_OpeningFcn', @trick1_OpeningFcn, ...
'gui_OutputFcn', @trick1_OutputFcn,
...
'gui_LayoutFcn', []
, ...
'gui_Callback',
[]);
if nargin
&& ischar(varargin{1})
gui_State.gui_Callback
= str2func(varargin{1});
end
if nargout
[varargout{1:nargout}] =
gui_mainfcn(gui_State, varargin{:});
else
gui_mainfcn(gui_State, varargin{:});
end
% End initialization code - DO NOT EDIT
% --- Executes just before trick1 is made
visible.
function
trick1_OpeningFcn(hObject, eventdata, handles,varargin)
% This function has no output args, see
OutputFcn.
% hObject
handle to figure
% handles
structure with handles and user data (see
GUIDATA)
% varargin
command line arguments to trick1 (see VARARGIN)
% Choose default command line output for trick1
handles.output = hObject;
global
ha
clc
ha(1)
= handles.axes1;
ha(8) = handles.axes8; ha(15)
=
handles.axes15;
ha(2) = handles.axes2; ha(9) = handles.axes9;
ha(16) = handles.axes16;
ha(3) =
handles.axes3; ha(10) = handles.axes10; ha(17) = handles.axes17;
ha(4) =
handles.axes4; ha(11) = handles.axes11; ha(18) = handles.axes18;
ha(5) =
handles.axes5; ha(12) = handles.axes12; ha(19) = handles.axes19;
ha(6) =
handles.axes6; ha(13) = handles.axes13; ha(20) = handles.axes20;
ha(7) =
handles.axes7; ha(14) = handles.axes14; ha(21) = handles.axes21;
ha(22) =
handles.axes22;
ha(23)
=
handles.text2;
ha(24) = handles.text3;
ha(25)
= handles.pushbutton1;
ha(26)
= handles.radiobutton1;
ha(27) = handles.radiobutton2;
ha(28) = handles.radiobutton3;
initialize_trick;
handles.t = 1;
% Update handles structure
guidata(hObject, handles);
% UIWAIT makes trick1 wait for user response
(see
UIRESUME)
% uiwait(handles.figure1);
% --Outputs from this function are returned to
the
command line.
function
varargout =
trick1_OutputFcn(hObject, eventdata, handles)
%
varargout
cell array for returning output args (see
VARARGOUT);
% hObject
handle to figure
% eventdata
reserved - to be defined in a future version
of MATLAB
% handles
structure with handles and user data (see
GUIDATA)
% Get default command line output from handles
structure
varargout{1} = handles.output;
% --- Executes on button press in radiobutton1.
function
radiobutton1_Callback(hObject, eventdata, handles)
% hObject
handle to radiobutton1 (see GCBO)
% handles
structure with handles and user data (see
GUIDATA)
% Hint: get(hObject,'Value') returns toggle
state of
radiobutton1
global ha
go_on(hObject,handles,1);
% --- Executes on button press in radiobutton2.
function
radiobutton2_Callback(hObject, eventdata, handles)
global ha
go_on(hObject,handles,2);
% --- Executes on button press in radiobutton3.
function
radiobutton3_Callback(hObject, eventdata, handles)
global ha
go_on(hObject,handles,3);
% --- Executes on button press in pushbutton1.
function
pushbutton1_Callback(hObject, eventdata, handles)
% hObject
handle to pushbutton1 (see GCBO)
% handles
structure with handles and user data (see
GUIDATA)
global ha
initialize_trick;
handles.t = 1;
% Update handles structure
guidata(hObject, handles);
To run the program and see the Matlab GUI, save
all these files with their respective names, put them into a single
directory,
go to that directory with Matlab and just type ‘trick1’ on your
command window.
Here's a
sample run.
Let's say
that we choose the ace of spades, so we click on the right radio button.
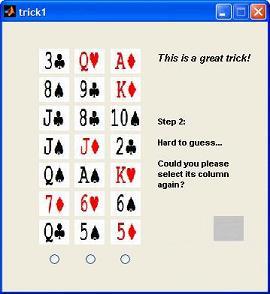
The
cards are reshuffled and we now click on the central radio button...
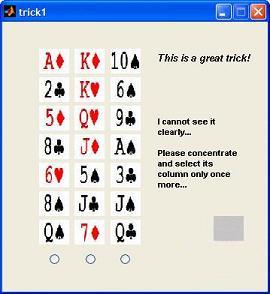
We
concentrate once more, to send clearer thoughts through our mental
interface... click on the right column again and...
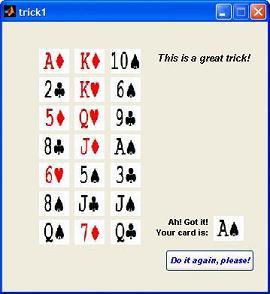
Nice trick, isn't it?
Enjoy!
(Download
here all the
necessary files)
From
'Matlab GUI' to home
From
'Matlab
GUI' to GUI menu


|